Instagram Cutouts: How to Make Custom Stickers on Instagram
Learn how to make custom Instagram stickers with the new Cutouts feature. We'll show you step by step.
Creating custom Instagram stickers used to require a lot of weird workarounds. But with the release of the new Instagram Cutouts feature, it's never been easier.
Cutouts are a pretty intuitive feature, but it does require a few steps and it works best when you come prepared with the right assets to use as your stickers. And, there are a few best practices to consider if you're using stickers for more than fun.
We'll cover everything you need to know in this tutorial. Let's start with getting access to Cutouts on Instagram.
✂️ Shortcuts:
- How to make stickers with Instagram Cutouts
- How to share branded Instagram stickers for anyone to use
How to make stickers with Instagram Cutouts
Instagram Cutouts is available anywhere the stickers feature is available. Instagram notes in its help center that stickers may not be available in Japan and certain European countries.
Here's how to make a custom sticker with Cutouts:
- Start by creating a new Instagram reel or story.
- Tap the sticker icon at the top right of the screen, to the left of the text icon.
- Tap on the "Create with Cutouts" button in the center of the screen.
- Upload a photo or video in the highest fidelity possible and, preferably, with a simple background.
- Wait for a few seconds as Instagram automatically generates a new sticker. If your upload contains multiple items or objects in the frame, Instagram will choose a single object to create a sticker for—don't worry, we cover this in detail below!
- (Optional) If Instagram isolated the wrong object in your upload, tap the "Select" button to manually select a new object or area to create a sticker with. (Note: You're only able to create one sticker at a time from one visual at a time.)
- Add your new custom sticker to your Instagram reel or story, or just save it for later.
- Edit your custom sticker into your Instagram reel or story by changing its location, size, and when and where it appears in your video.
Now, let's go into more detail for the important steps—including what uploads work best for Cutouts and how to manually select objects for custom stickers.
Step 1: Create a new reel or story
Tap the Post (+) button or create a story to get started. If you're new to Instagram's formats, check out our post on How to Post a Video on Instagram Reels, Stories, and Feed for more details.
Step 2: Open Instagram Cutouts
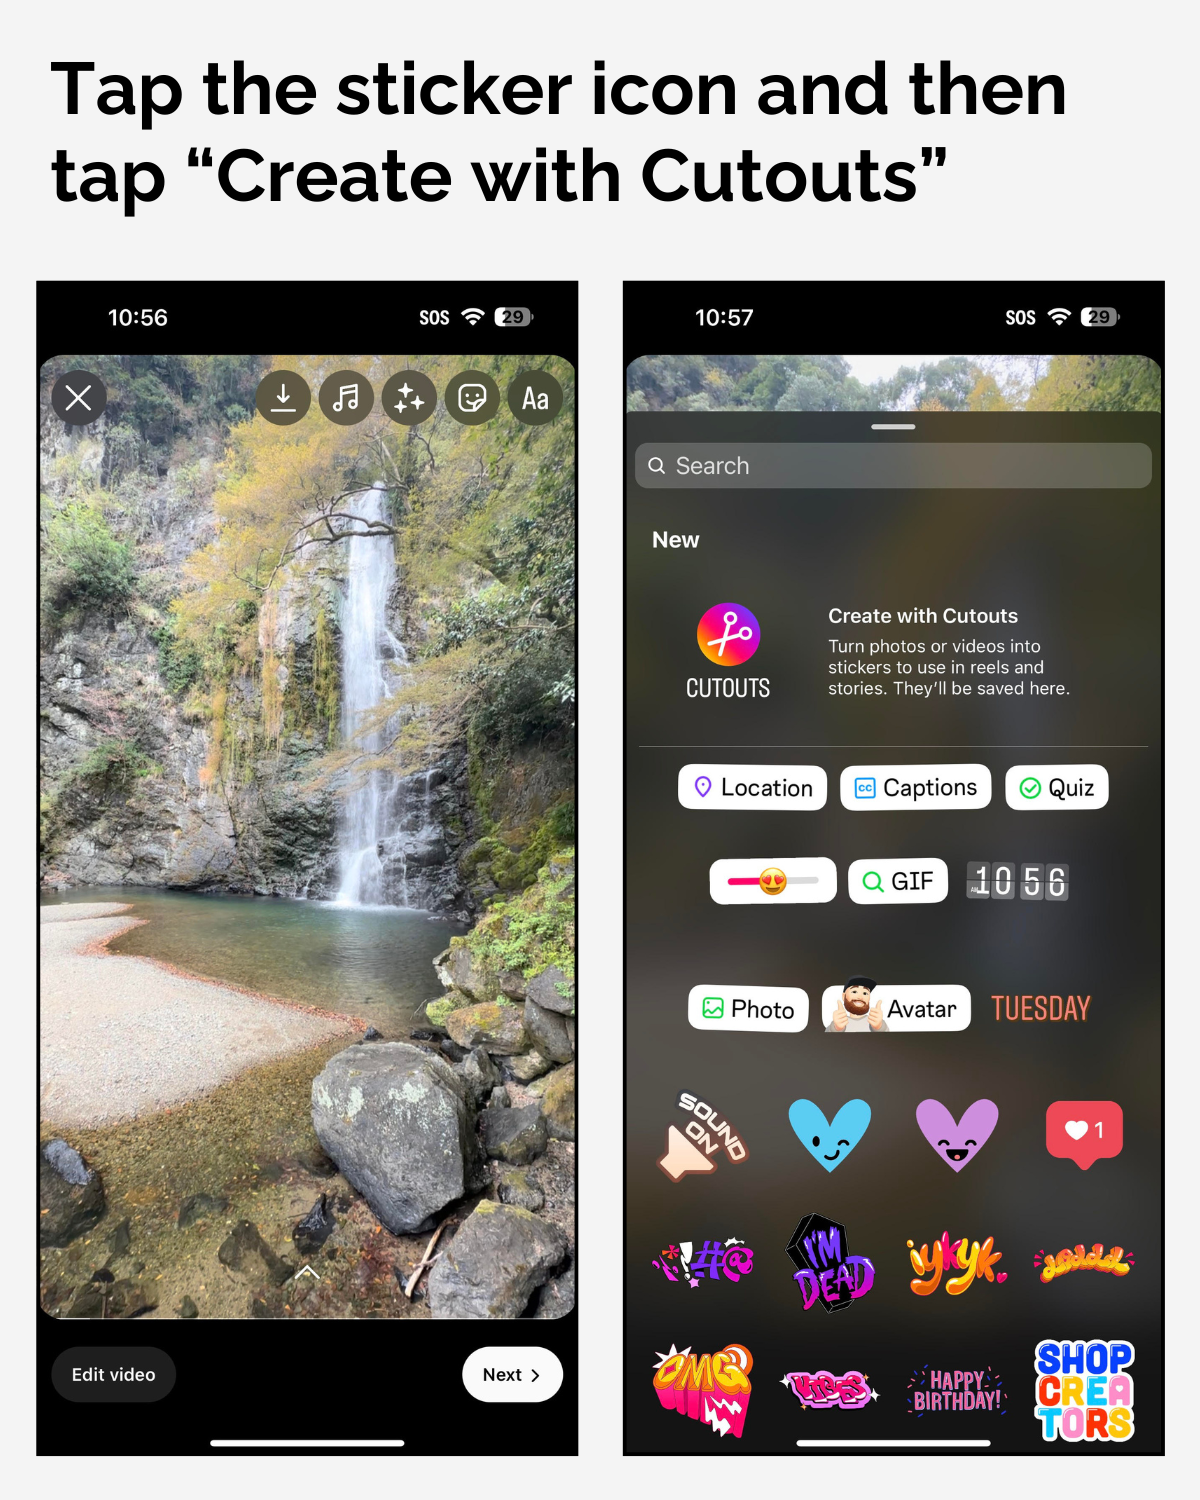
Once you've created a reel or story and selected an image or video to upload, the sticker icon will appear in the top right of your between the filters (✨ ) and text (Aa) icons. Tap the sticker icon and a pop-up will appear.
If it's your first time using Cutouts, a large button will appear in the middle of the pop-up above the normal sticker options. Tap on this section of the screen to start creating a custom sticker with Cutouts.
Step 3: Upload a photo or video file for your sticker
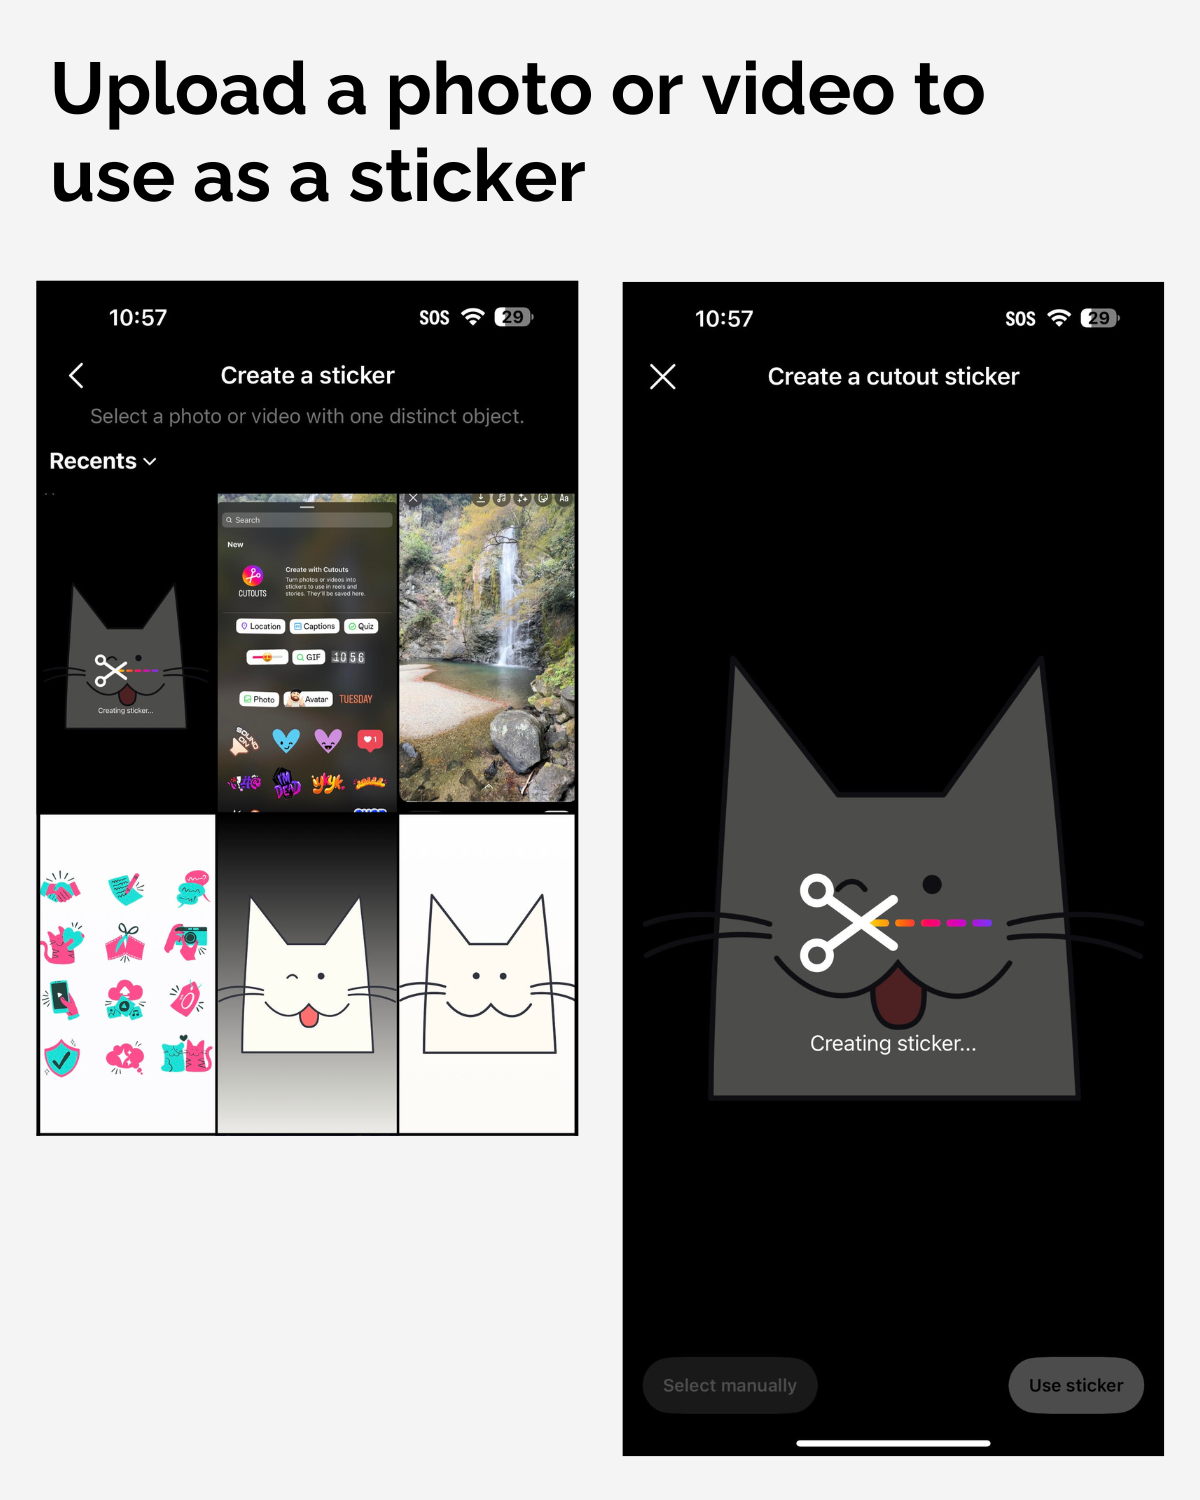
You can use either a static image or a short video (between 1-6 seconds) to create your custom sticker. Images are often a lot simpler and tend to work better with Cutouts automatic selection tool, but we'll cover both options and highlight some best practices.
Stickers from images
In the example image above, I'm using a transparent .png of Kapwing's mascot, Kit, to create a custom sticker. I tried this with both a transparent background and a simple colored background and both worked quite well with Cutouts automatic selection; the tool correctly identified Kit and cleanly cropped out the rest of the image.
If you're looking to make your stickers look as clean as possible—and avoid fiddling with the manual selection—try to upload images with these characteristics:
- A single subject in clear focus. Images that work best include the exact subject you want for your sticker front and center. As we'll see below, however, an image can include multiple subjects but still works best when each subject is visually distinct in the image.
- The background is simple or transparent. Noisy backgrounds don't work great for Cutouts because patterns or small objects in the background can be mistaken for the "main" subject, which causes Cutouts to focus on them.
Stickers from videos

When you upload a video clip to use with Cutouts, you'll be prompted to shorten the footage to 1-6 seconds. You should note that once you select "Next" to start creating your sticker, Cutouts will pull options from the very first frame of your video—keep that in mind when selecting footage.
While Cutouts does a pretty good job automatically finding the right subject in simple, static images, you'll most likely have to manually select the correct subject in video clips. In the example above, Cutouts initially clipped a random section from the sign in the top left of the screen.
I then selected the manual option and tapped on three separate areas in the small yellow sign. As you can see, Cutouts responded pretty well and honed in on that sign, cropping out the areas surrounding it. The crop certainly isn't perfect and I'd likely get better results with a dedicated image editing tool, but it's fast and reasonably good for a tool available right inside the app.
Step 4: Manually select a subject to create a sticker (Optional)
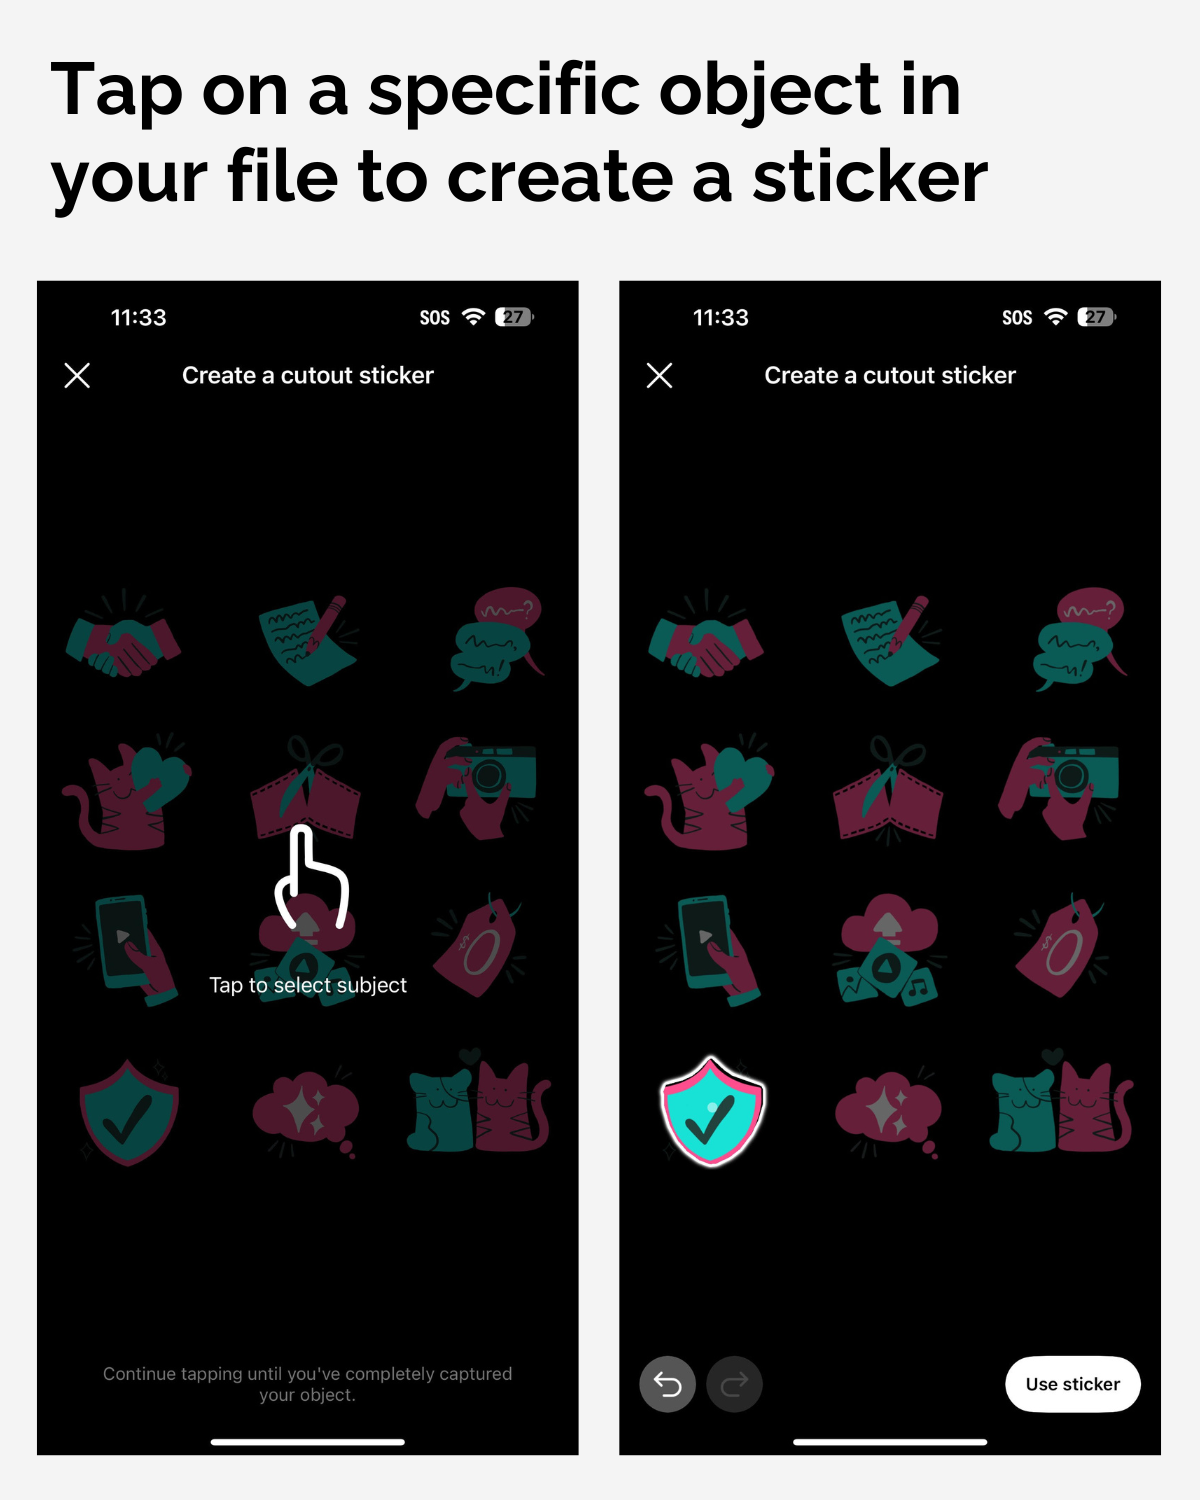
Let's explore the manual selection tool in Cutouts a little more closely. I wanted to see how the tool worked with many options in a single photo, but where each option was visually distinct from the others.
Spoilers: It worked great! In the example above, Cutouts initially selected the Kapwing icon from the top right, but I chose to manually select a subject and tapped the icon in the bottom left just once.
This was consistent with my other image tests: so long as the subjects in an image are visually distinct, Cutouts does a great job of honing in and cropping anything you tell it to.
Step 5: Add and edit your custom sticker a reel or story
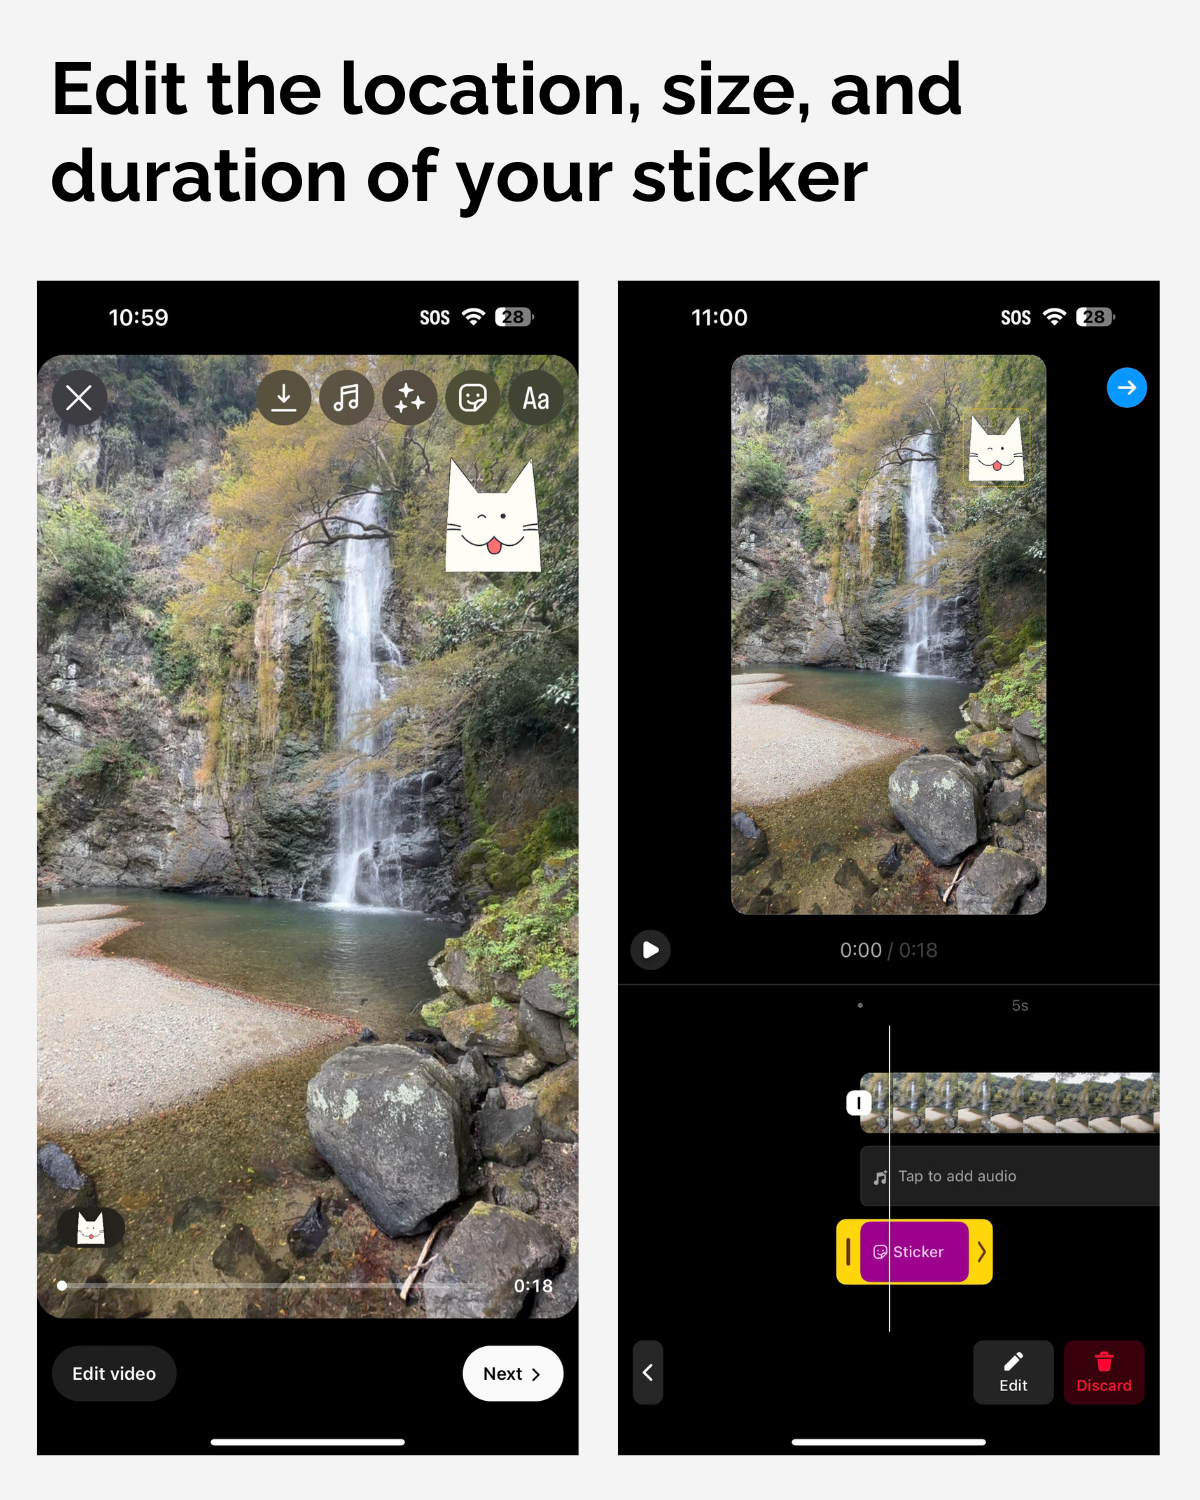
Once you've created a custom sticker with Cutouts, you can either save it for later or add and edit it directly in your reel or story.
The standard editing interface for stickers appears once you've added your custom sticker, along with all of the usual editing options for stickers:
- Edit the size. Use the touch screen to select and expand or shrink your sticker with your fingers—similar to zooming in or out on an image.
- Edit the location. Drag and drop the sticker anywhere on the screen by tapping it, holding it down with your finger, and dragging it to a new location.
- Edit the duration. Once you've found the right size and location, use the timeline markers in Instagram's editor to choose when your sticker will appear in your story or reel. By default, the sticker will remain on the screen for the entire video.
How to share branded Instagram stickers for anyone to use
There's another cool way to use stickers that most brands haven't taken advantage of, which is sharing custom stickers to GIPHY for others to use on their stories and reels. Fortunately, the steps for doing this aren't all that complicated.
To get branded stickers on Instagram, we’ll be working with two free platforms: Kapwing, our product, which we'll use to create your custom Instagram stickers, and GIPHY, a hosting platform for GIFs, and the channel we'll use to officially verify your stickers. Here’s how to get started:
Step 1: Create a GIPHY account
First, create a GIPHY account. Don't worry, it's free. You'll also have access to countless other creations and the ability to have your own library of GIFs and stickers.
Step 2: Design and make your Instagram stickers
Here's the fun part: start designing and making your own Instagram stickers by heading to Kapwing's AI Photo Editor.
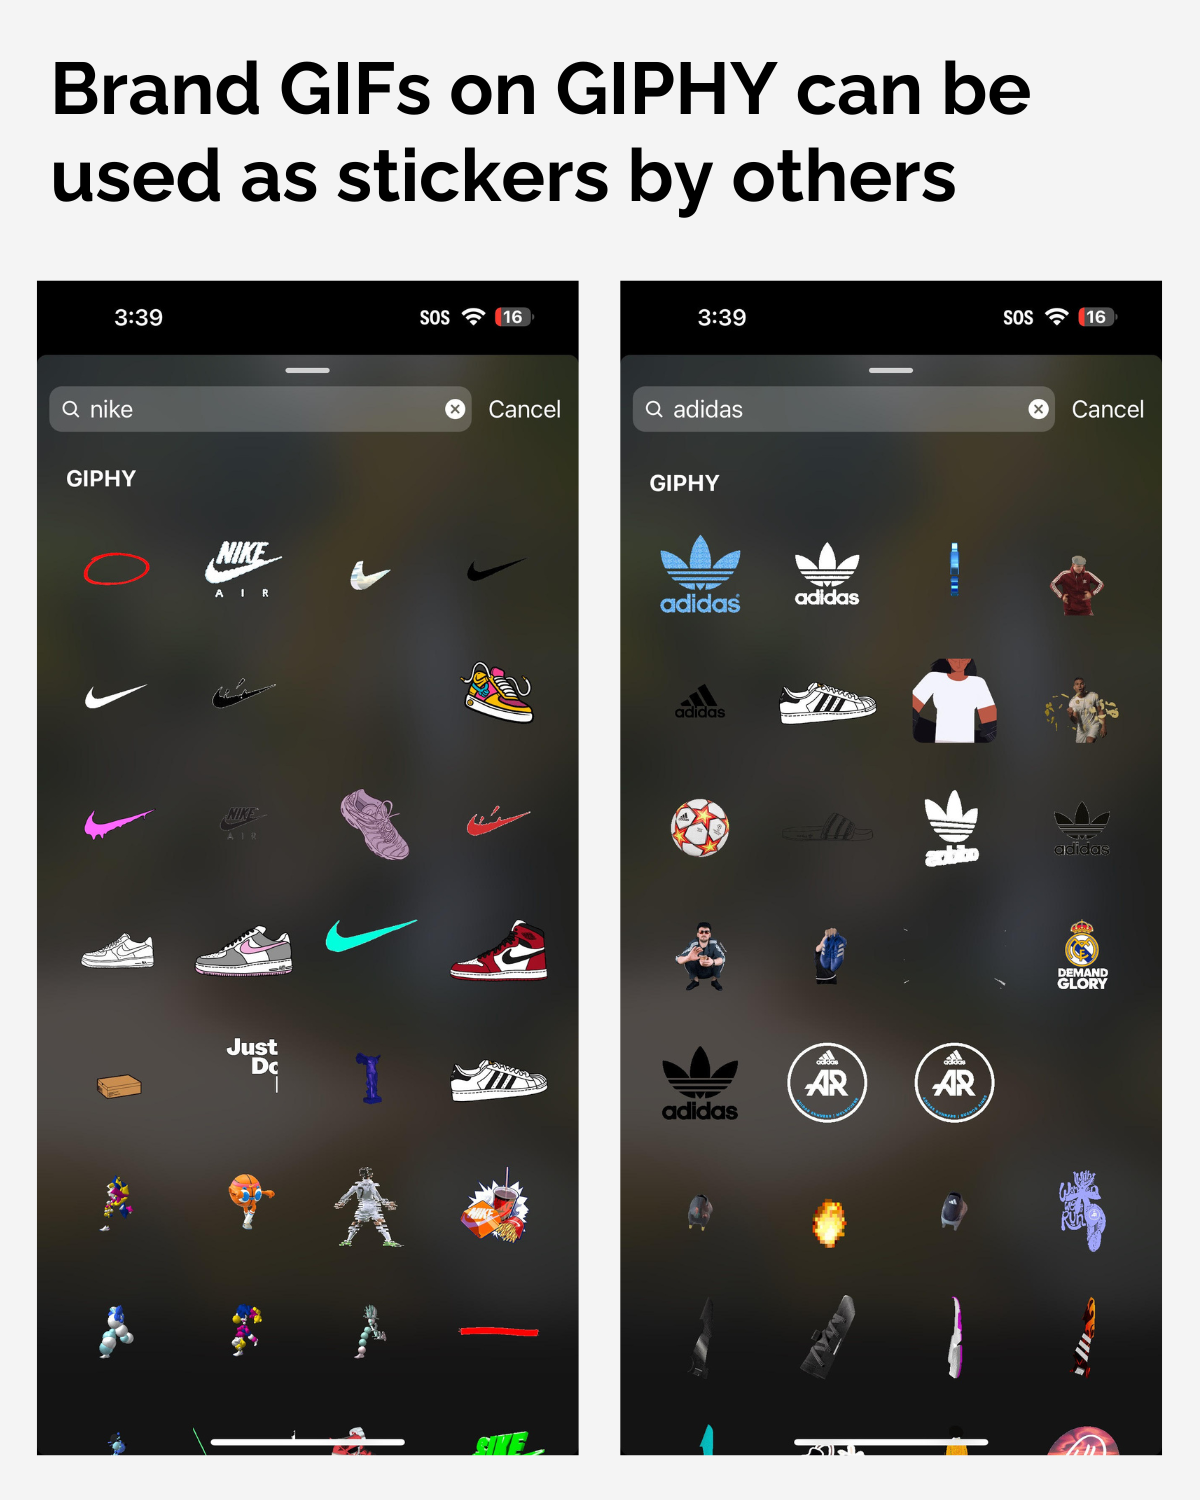
If you need some inspiration, you can also search for other GIFs in the studio itself. Luckily, Kapwing's elements and GIFs are powered by GIPHY, so you can easily browse other stickers that you find will fit your brand and message. Simply click the "Elements" tab on the left sidebar and search any keyword you feel relates to your brand.
For this example, I'm going to upload a custom GIF featuring the Kapwing video player. This GIF is already finished, but you can also use Kapwing's GIF Maker to turn a static image, a combination of images, or a video clip into a smooth GIF.
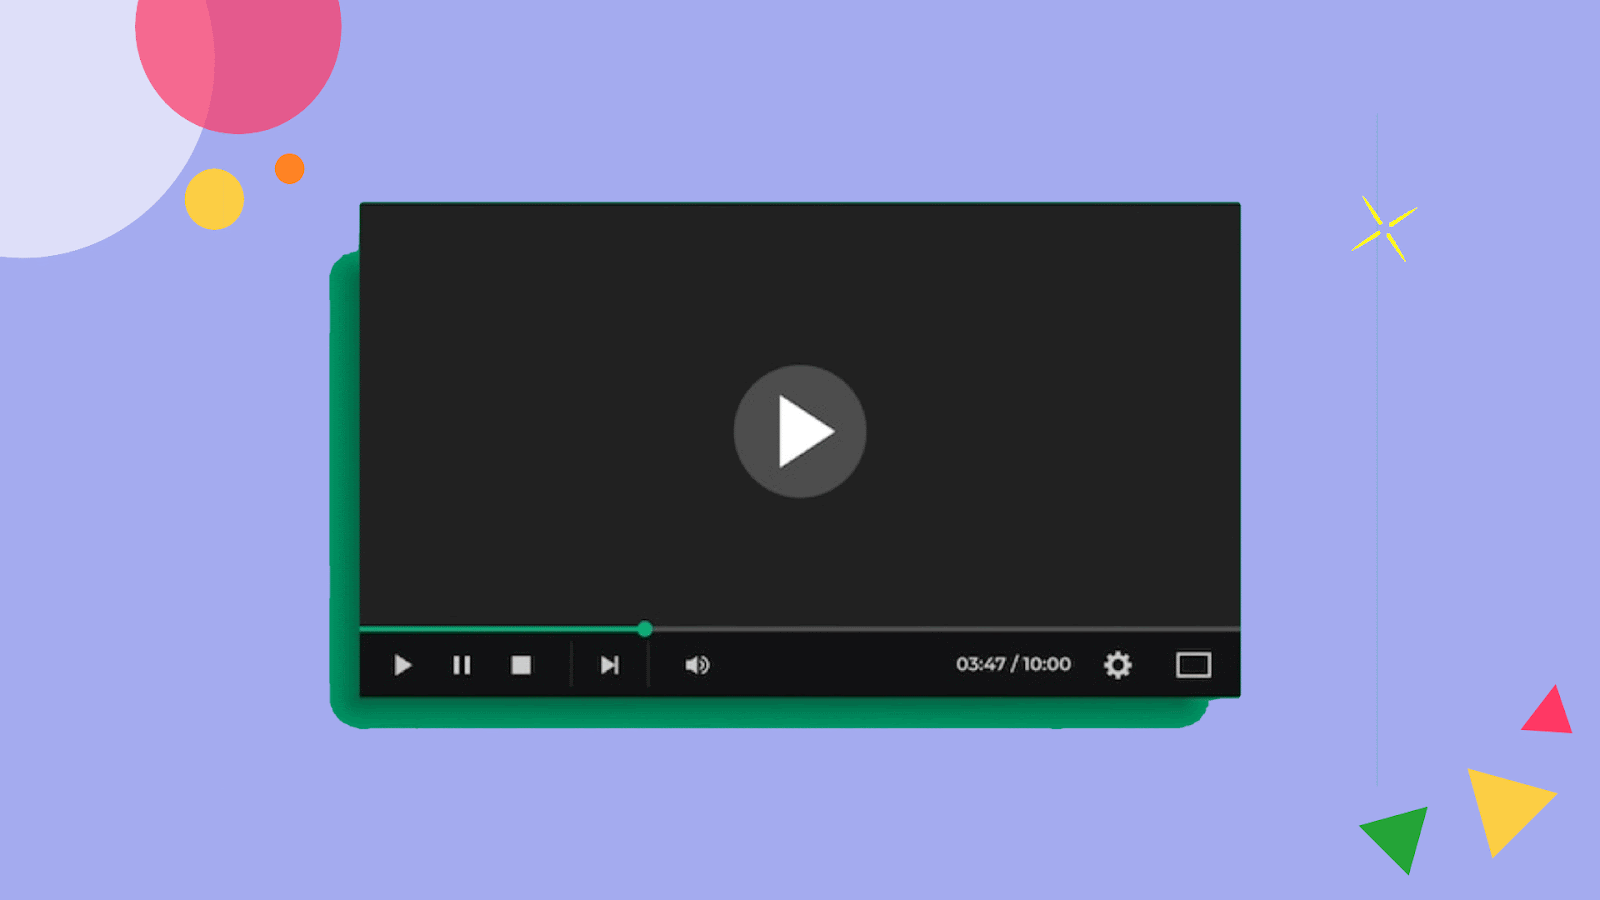
Once you're finished making the GIF you'll use as your Instagram sticker, click the dropdown arrow next to the Export Video button and select "Export as GIF."
Why a GIF? Because Instagram's integration with GIPHY is the only way to upload a sticker and have it be discoverable by other users in the sticker search bar.
Step 3: Upload 5 designs to GIPHY
To continue on to the next step, you'll have to upload at least 5 of your new designs to GIPHY. Once you've done that, then you can start applying for a verified brand account.
Step 4: Apply for a verified brand account on GIPHY
Applying for a verified brand account is easy once you've met the application requirements. After you've applied for a brand channel, your application will take around 3-10 business days to process.
In the meantime, you can keep creating stickers in Kapwing, or figure out a marketing strategy for when your branded Instagram stickers are ready to use.
Step 5: Use and promote your stickers
Congratulations! You now have a GIPHY brand channel and account. This means anyone can access your branded stickers from your marketing team to your customers.
Since you have a brand account on GIPHY with your stickers, anyone will be able to access your GIFs and stickers on any social media platform that supports GIPHY such as X (Twitter) or TikTok. You're also now able to access GIPHY's analytics dashboard to view how well your stickers are doing and on which platforms.
Custom Instagram stickers made easy
Instagram Cutouts is definitely a long-overdue feature that makes custom stickers so much easier to create, especially if you don't want to spend additional time creating a GIF or have no need to make the sticker public.
It's a nice upgrade to brands and creators who want to add more of a visual identity to their videos. We'll keep a close eye out for interesting examples and share them here once more creators have gotten the chance to experiment with Cutouts.
📚 Read these next:
- How to Fit the Whole Picture on Instagram Without Cropping
- How to Post Multiple Images With Different Sizes to Instagram
- How Long Can Instagram Stories Be in 2024?
- How to Post a Long Video on Instagram: Reels, Stories, Feed
- How to Add Captions to Instagram Stories Automatically