How to Post a Full Photo on Instagram Without Cropping
Fed up with uploading Instagram photos that get automatically cropped?

The best way to make a picture fit on Instagram is to resize it before you upload it. Why? Because the Instagram app only allows cropping, not resizing.
In this article, we’ll provide detailed instructions to ensure every picture you upload fits perfectly on IG, including landscape and portrait images. Whether you're posting tall vertical photos or wide horizontal shots, this guide will help you maintain original quality and composition without cropping, sacrificing image quality, or accidentally cutting off someone's head.
- How to post full photos on Instagram
- Why black is the best background for Instagram posts
- Instagram post aspect ratios in detail
- FAQs
How to post full photos on Instagram
To post full photos on Instagram without cropping, you’ll need to resize them manually using a third-party tool. If you don’t, Instagram will automatically crop the image, often resulting in unwanted cuts.
While most resizing tools require downloading from an app store, Kapwing's image resizing tool is free and accessible directly from any browser — no downloads are needed. Whether your picture is in full portrait (9:16) or landscape (16:9), you can fit the whole picture in your Instagram post by following these five steps:
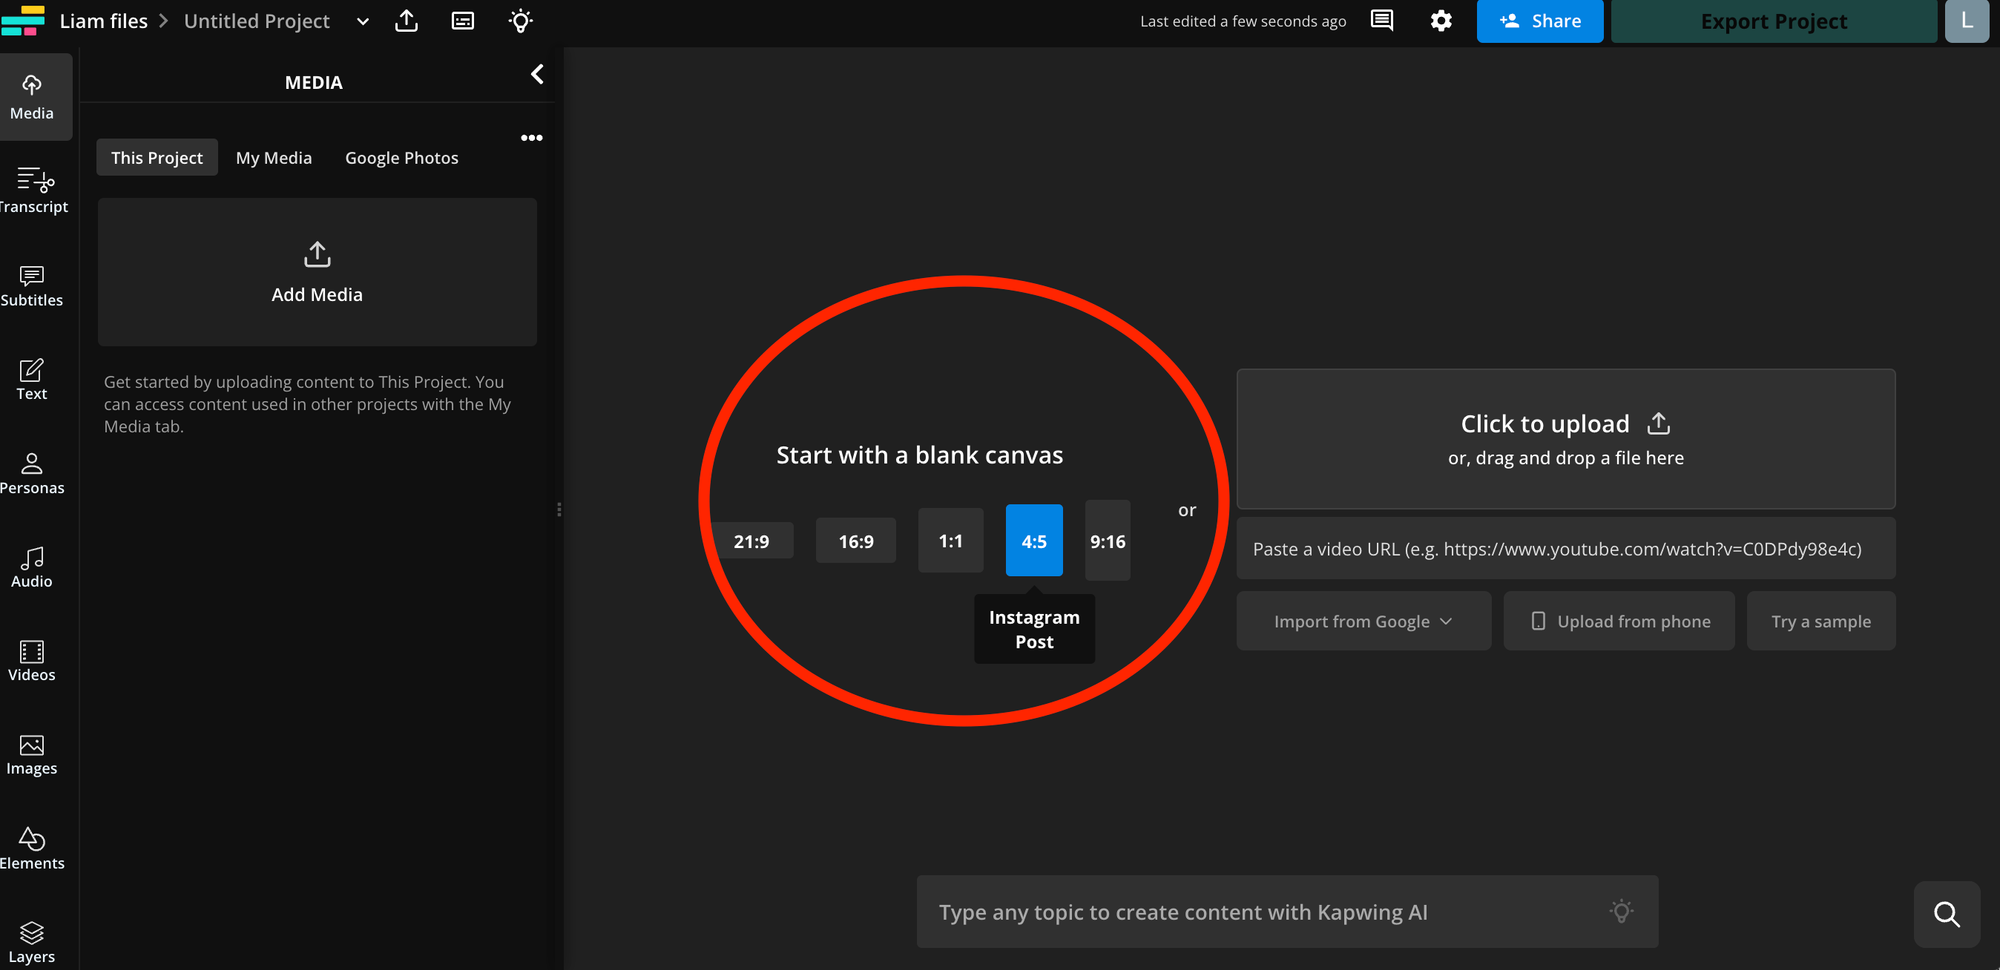
Step 1) Open a 4:5 Canvas in Kapwing
Open Kapwing.com on your phone or computer. Select the 4:5 preset aspect ratio under "Start with a blank canvas."
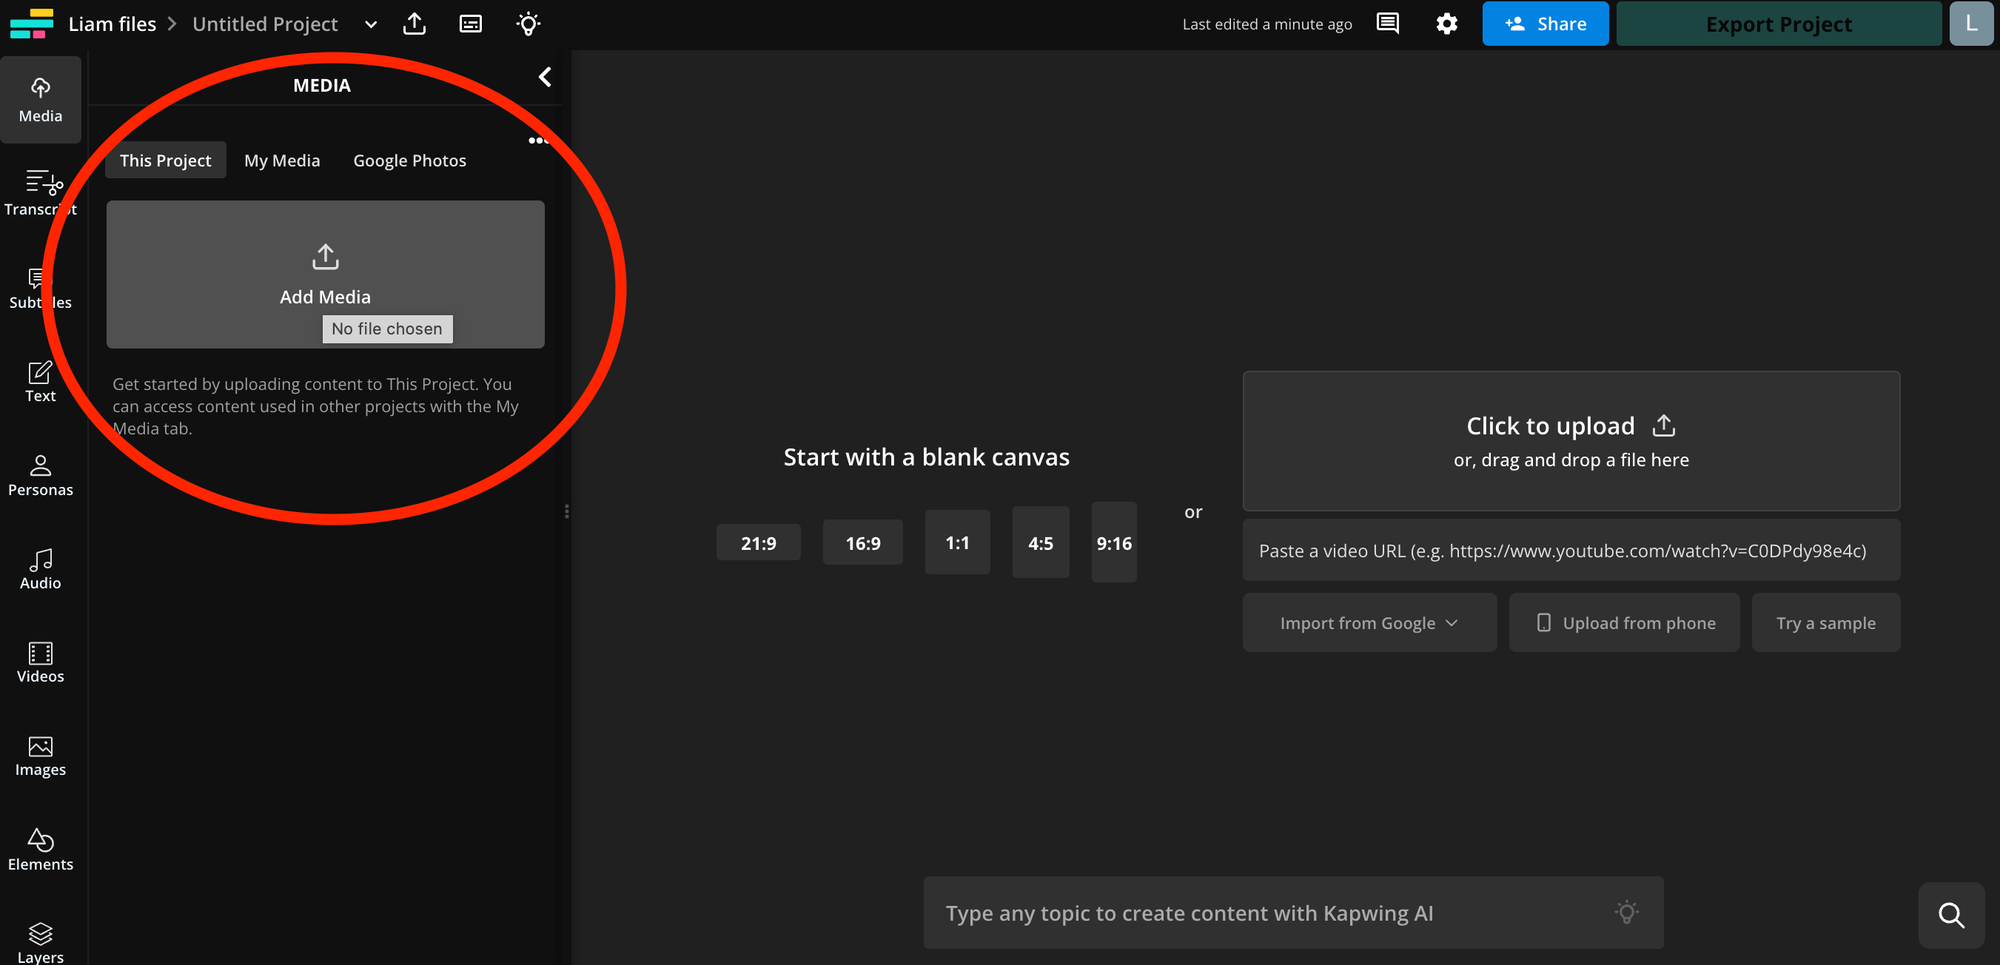
Step 2) Upload the Picture You Want to Resize
Tap the Media tab on the menu bar at the bottom of your screen then tap the “Add Media” button.
Upload photos from your camera roll or import them from a URL. Kapwing also integrates Google Photos and Drive, if your image is stored on the cloud.
The photo will be added to the Media tab.
Step 3) Center the Photo on the Canvas
Tap the blue plus icon over the image to add it to the canvas.
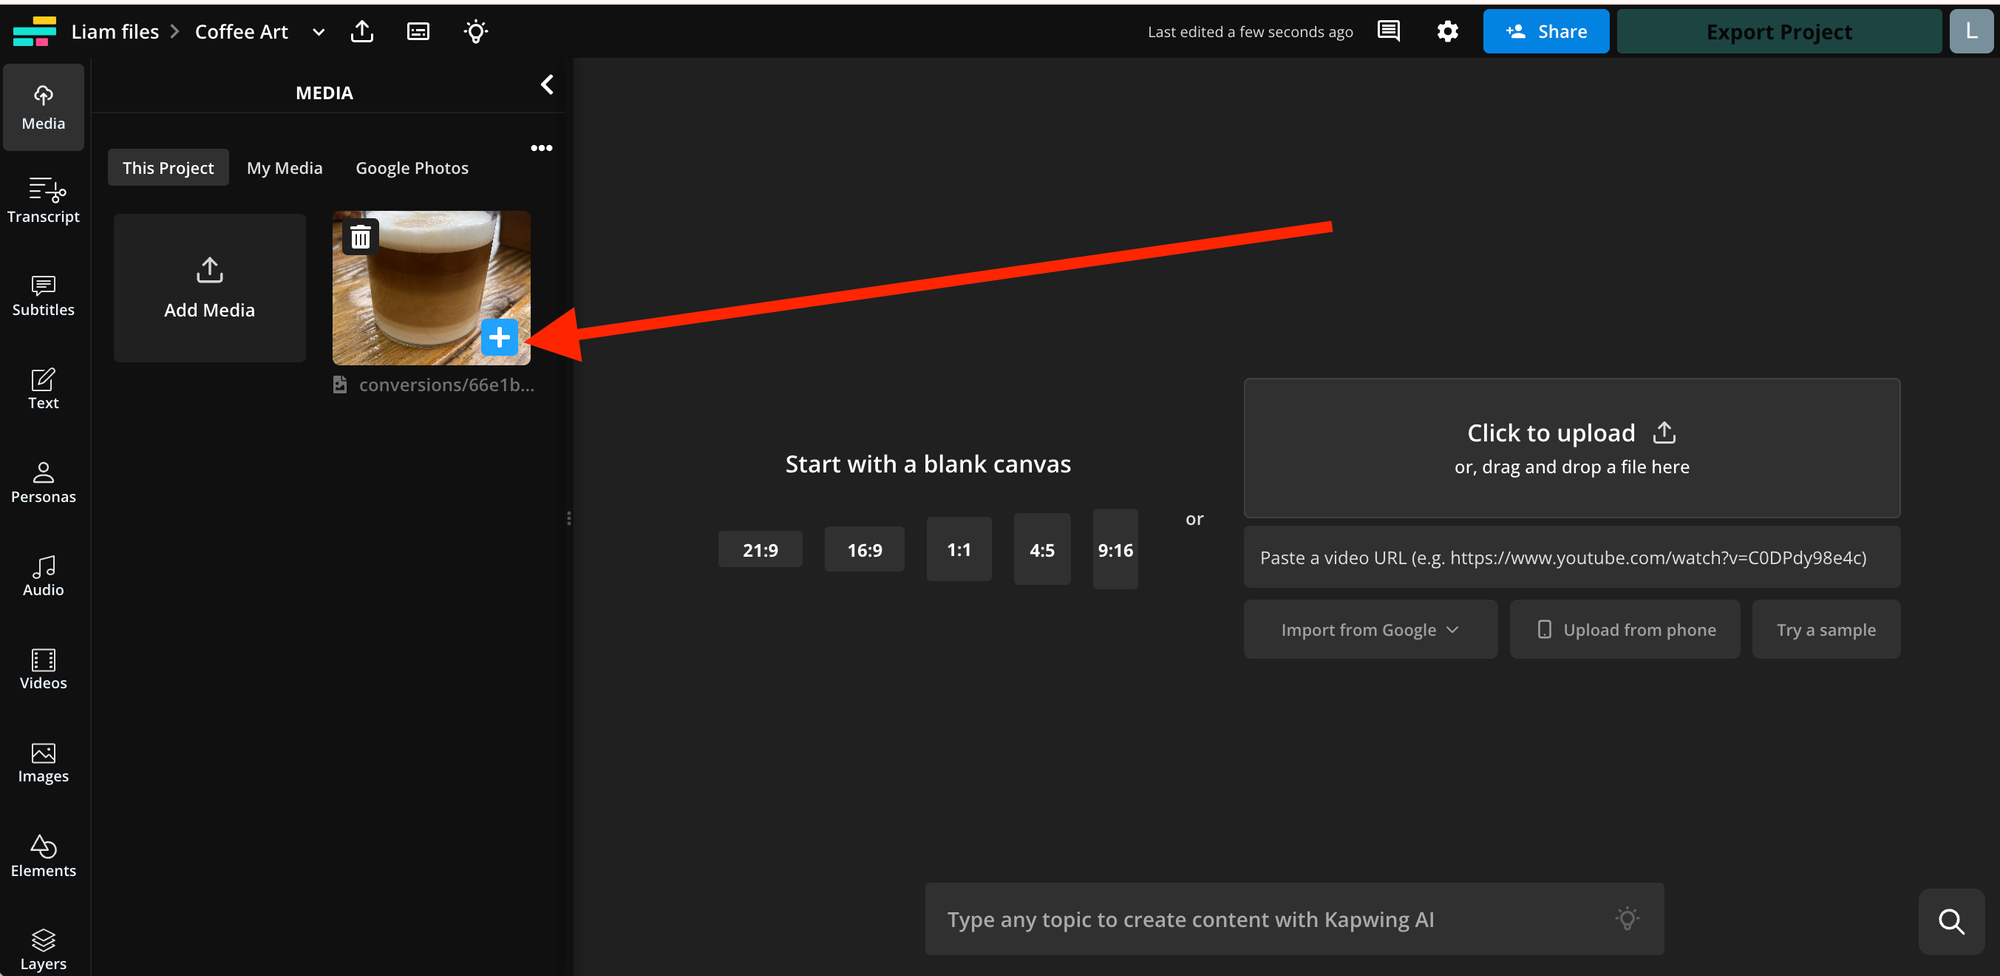
Kapwing will automatically center the photo in the middle of the canvas. This will add a white border to either side of the image.
Step 4) Set the Background Color for the Image
Tap outside the image to select the background. You should see a button appear labeled “Edit background.” Tap it.
Scroll down until you see the canvas Background Color options.
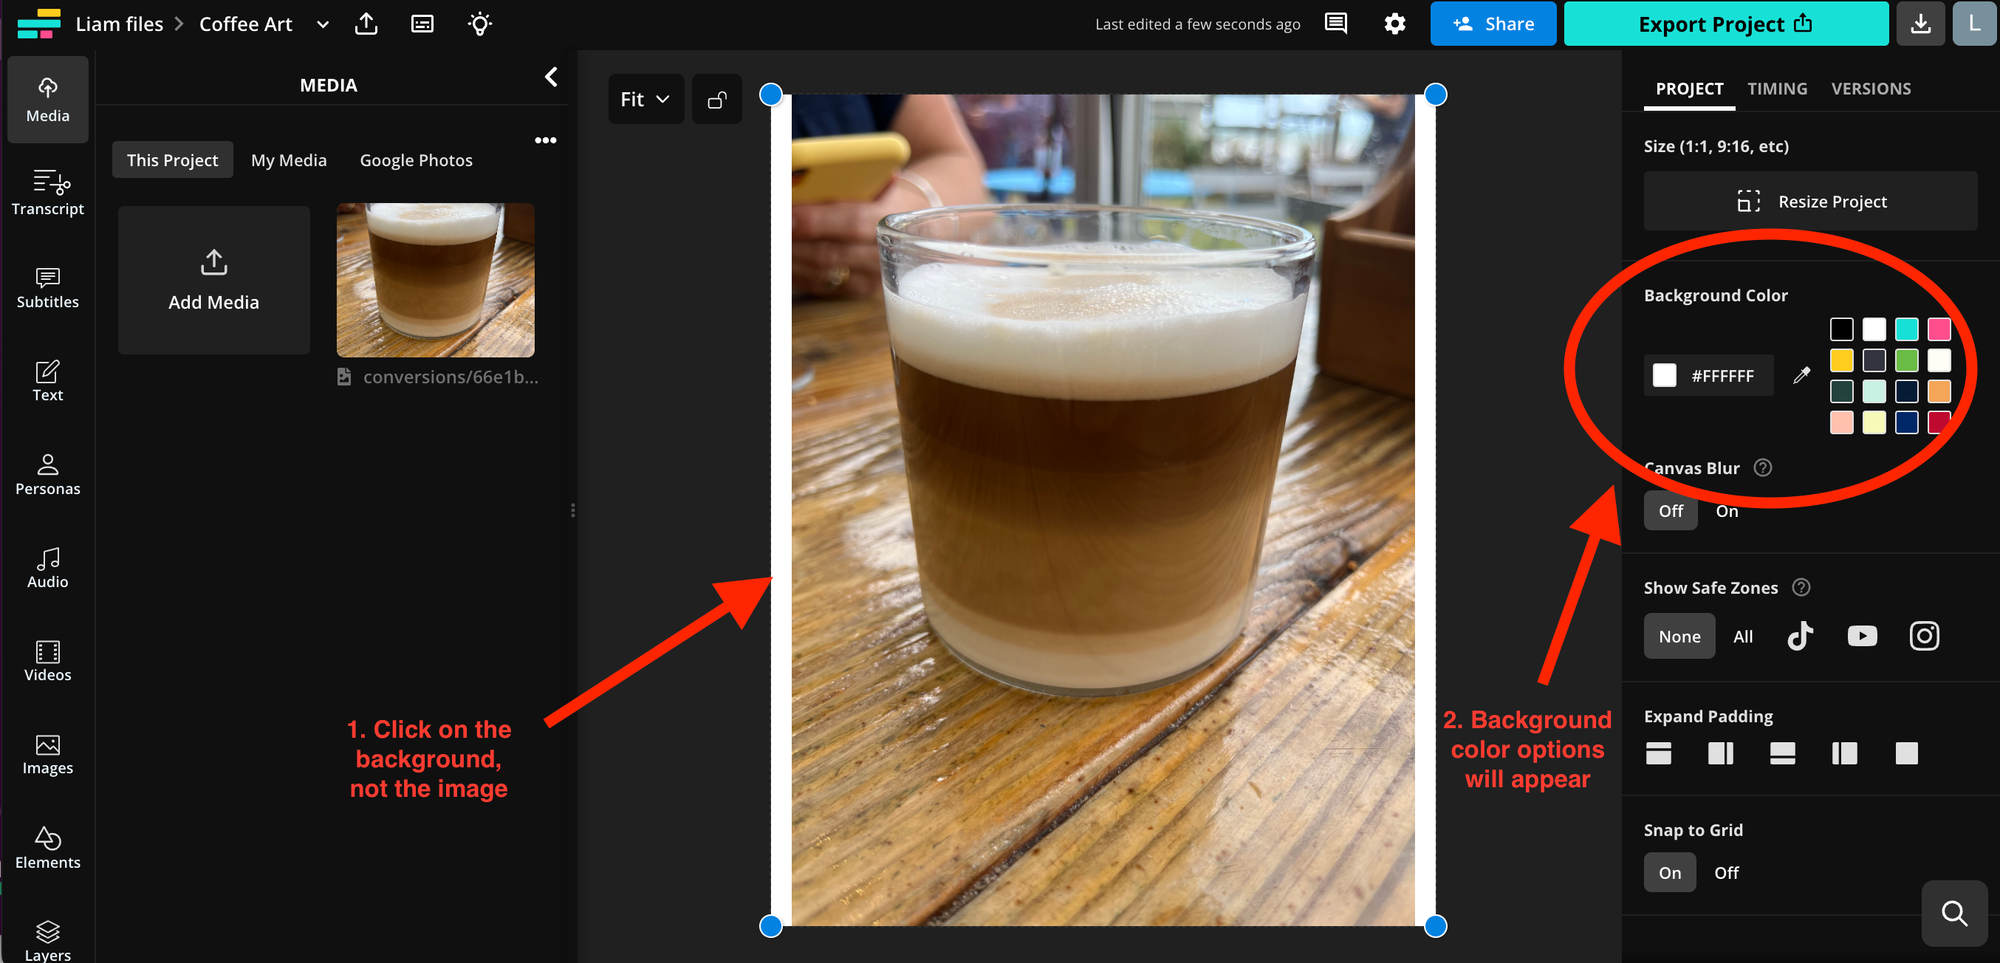
You can choose any background color you want using the custom color-picking tools. We recommend using black for a subtle look that blends well with Instagram’s interface.
Step 5) Download the Photo and Post on Instagram
Tap the export button in the top right corner of your screen and export the portrait photo as a JPEG.
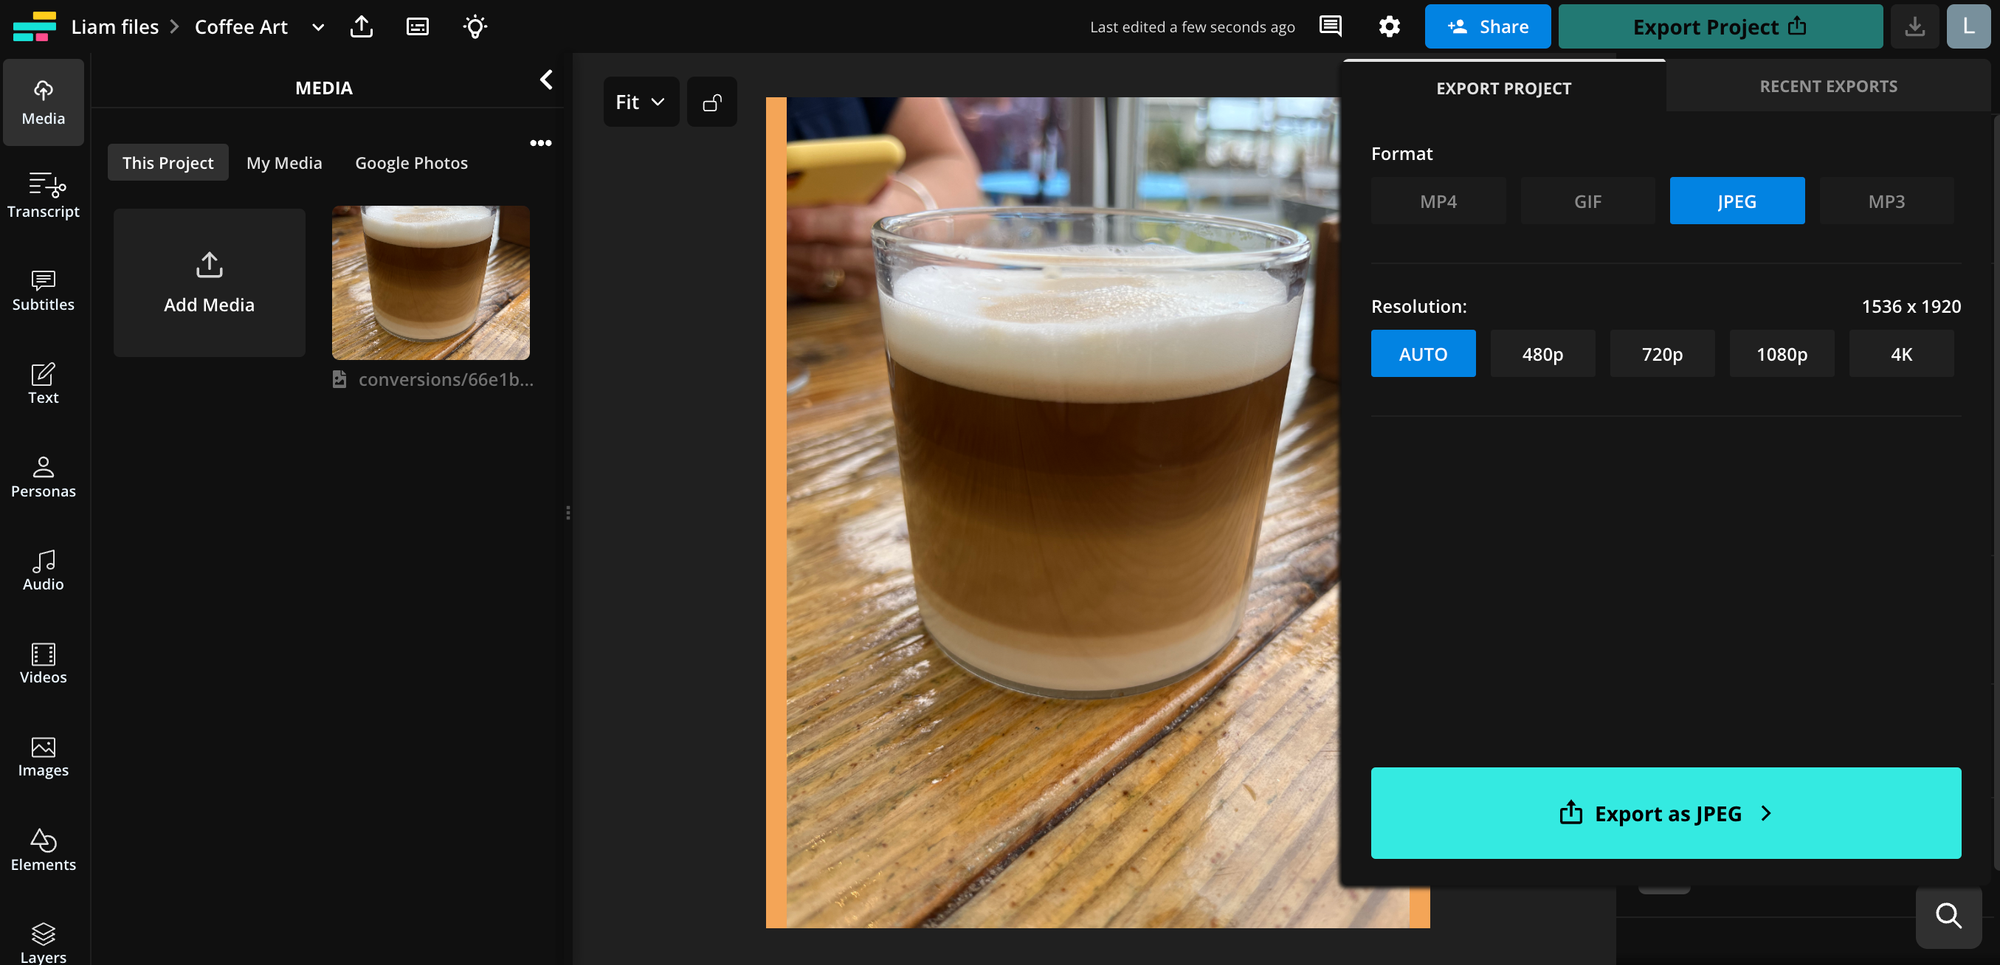
Once the image has been exported, scroll down to the “Download file” button and tap it. This will save the image to your device. Open Instagram and publish as normal.
Using this method, you'll never have to crop out a friend’s foot or sacrifice a family member from a landscape family photo again. Likewise, you can use the template you just created for future IG uploads in both landscape and portrait.
Why black is the best background for Instagram posts
To make a resized Instagram photo look like it doesn’t have a border, adding a black background is your best option. Since over 80% of smartphone users have dark mode enabled, and Instagram follows your phone’s settings by default, most Instagram posts are viewed in dark mode on mobile devices.
A white background can stand out in dark mode, drawing attention away from the photo. A black background, however, seamlessly blends with the Instagram interface, making it look like part of the app.
If you're posting multiple photos — whether tall portrait images or wide landscape shots — using a discreet black background ensures your posts look better in both the feed and your profile grid.
While it’s not a perfect solution, it works well since Instagram doesn’t support transparent background PNGs. Typically, turning an image into a PNG with a transparent background would solve the issue, but Instagram automatically converts PNGs to JPEGs, replacing transparent areas with black pixels.
Instagram post aspect ratios in detail
The Instagram app is pretty notorious for compressing high-res photos. As stated by Instagram, your photos should have the following dimensions for the best resolution:
- 566 to 1350 pixels high
- 320 to 1080 pixels wide
If you upload a photo to Instagram that is too small, Instagram will automatically enlarge it to at least 320 pixels wide. Conversely, if your photo is too large, Instagram will resize it down to a maximum width of 1080 pixels. This automatic resizing and compression can result in a loss of detail, making your images appear grainy. To avoid this, we recommend using a third-party tool like Kapwing that supports lossless compression to resize your photos before uploading them to Instagram.
To ensure that your photo is displayed on IG at the highest possible quality, follow these recommendations:
- Make sure you're using the latest version of the Instagram app.
- Upload photos with a width of at least 1080 pixels and an aspect ratio between 1.91:1 and 4:5.
- Use a phone with a high-quality camera for better image resolution.
For more details on the best aspect ratios for Instagram Reels, Threads, and videos, check out our comprehensive guide on social media sizes.
Frequently Asked Questions
1. Why do my pictures not fit on Instagram?
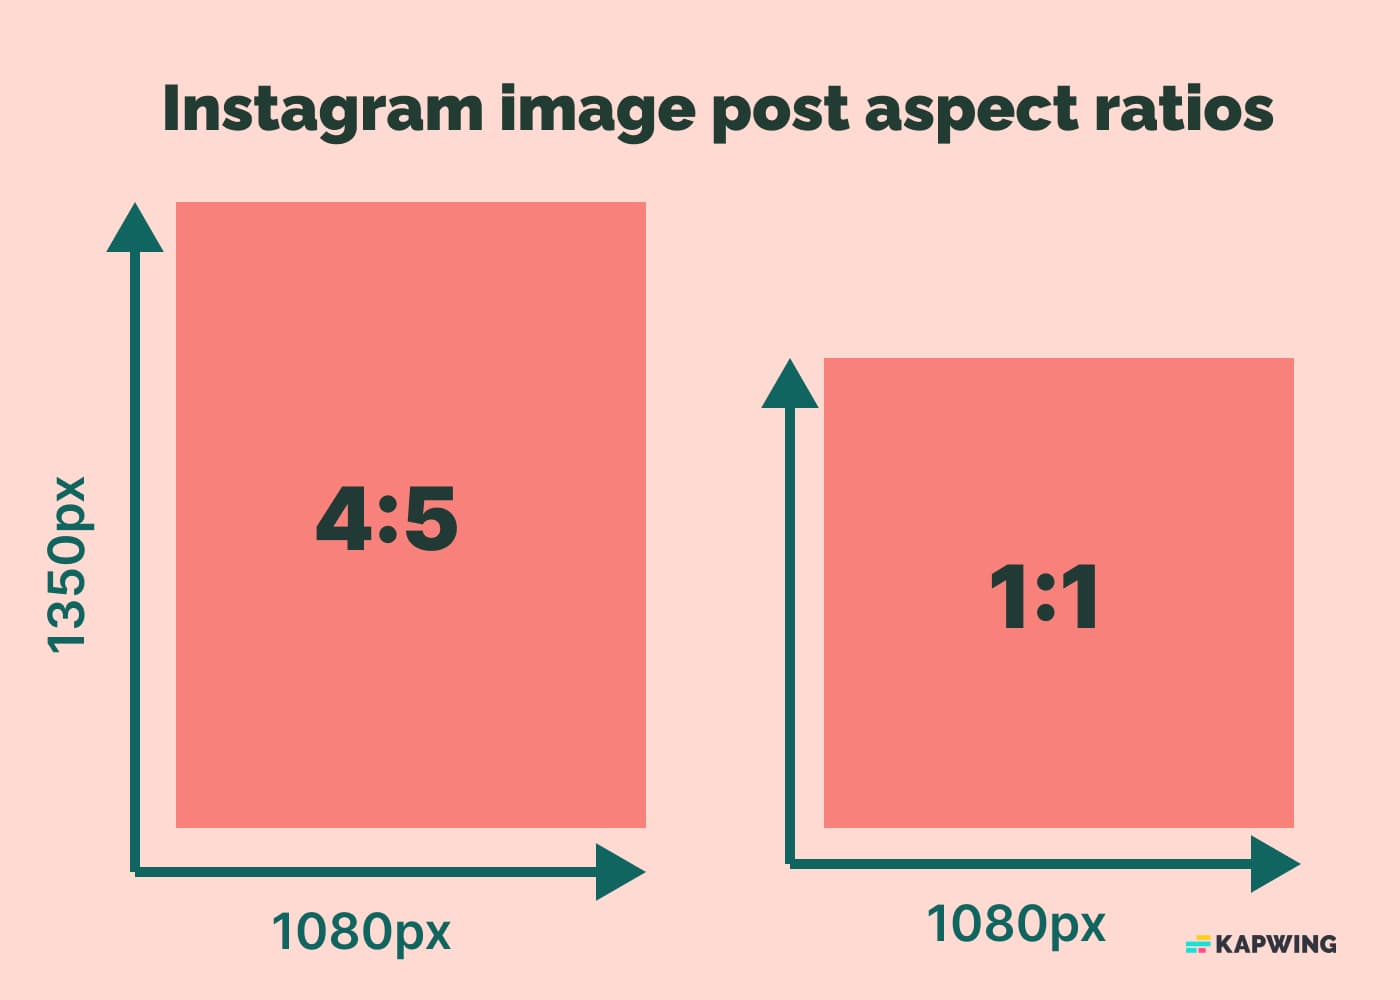
Instagram enforces a maximum aspect ratio of 4:5 for all image posts. This means you can upload photos with aspect ratios between 1:1 (a square) and 4:5 (a vertical rectangle that is four units wide for every five units tall). If your image exceeds these dimensions, such as in taller portraits or wider landscapes, Instagram will automatically crop the image to fit within the allowed size, potentially cutting off parts of your photo.
2. How do I stop Instagram from cropping my photos?
If Instagram is cropping your 4:5 images into a square, tap the expand arrows in the bottom left corner of the post preview to switch the size back to 4:5. For images that are taller than 4:5, you can use a third-party tool like Kapwing to resize them. Simply center your photo on a 4:5 canvas, adjust as needed, and save it for uploading.
3. What are the aspect ratio rules for Instagram?
Instagram supports multiple aspect ratios for photo uploads, including a 4:5 limit for vertical images and 1:1 for classic square posts. For video content like Reels, Instagram uses a 9:16 aspect ratio, providing a full-screen, vertical format.
4. Why does Instagram crop photos?
Instagram crops photos to maintain a consistent 4:5 and 1:1 aspect ratio across all images. This resizing and compression help create a uniform look for its 1.4 billion monthly users worldwide. With over 98% of Instagram users accessing the platform from mobile devices, the automatic cropping and strict aspect ratios ensure that photos are optimized for better viewing on mobile screens.
5. Why won't Instagram upload my high-res image?
Instagram automatically compresses images to manage the vast amount of data uploaded daily — over 95 million photos and videos. However, you can maintain better image quality by enabling the 'Upload at Highest Quality' option, found under 'Data Usage' in your account settings. This helps ensure your photos are uploaded with the best possible resolution.
For more info and tutorials like this, visit our Resources Library or check out our YouTube channel.
Try these popular Instagram resources: