Silence Removers: The Best Tools for Cutting Silences from Your Videos
Silence and long pauses are a natural part of human speech, but they don't have to be in your videos. We’ve rounded up the top silence remover tools to help cut your workload in half and produce polished, engaging content.

If you’ve ever recorded a video or podcast with a voice track, you know silences, long pauses and repeated words are just part of the process. Even the most seasoned professionals find themselves pausing longer than necessary during an otherwise perfect video. A five minute video can take around 15 minutes to remove silences.
And the longer the raw footage, the more time it takes to manually edit out silences. You could spend hours just cutting out pauses in a video.
But what if you didn’t have to waste all that time just editing out the silence?
Why use a silence remover tool?
Manually removing silences from videos can be tedious, cutting into your workflow and slowing you down. Fortunately, manually isn’t the only method anymore.
As video editing software gets more advanced, many programs offer silence removing plugins or tools. In this article, we’ll take a look at some of those different silence removal tool options so you can decide which is best for your needs.
Quick look at our top picks
- 🏆 Best online silence remover: Kapwing
Intuitive interface and user friendly features make editing a breeze. Silence detector Smart Cut uses ai to search out long pauses and silence on your videos, podcasts and vlogs, cutting out hours of extra work. Smart Cut is also adjustable, giving you complete control. - 💻 Best silence remover for Windows: Wondershare Filmora
Wondershare Filmora’s silence remover add-on is super fast and fairly easy to use. Create fun and flashy video clips without the tedium of manually editing silent parts and long pauses. - 🖥️ Best silence remover for Mac users: Apple iMovie
Apple iMovie comes with beginner friendly tools for editing audio tracks. While not 100% automatic, for software that’s 100% free, we’re pretty impressed with this powerful tool. Plus, iMovie’s audio editing tools come with iMovie and work on your mobile devices. - 🖥️ Best pre-editor for removing silences: Recut
Recut removes silences from your file before you upload it to your video editor of choice (compatible with DaVinci Resolve, Final Cut Pro, or Adobe Premiere Pro). Settings can be tweaked to control the silence detector, helping keep the flow of your audio files smooth and natural.
1. Kapwing
Best Online Silence Remover Tool
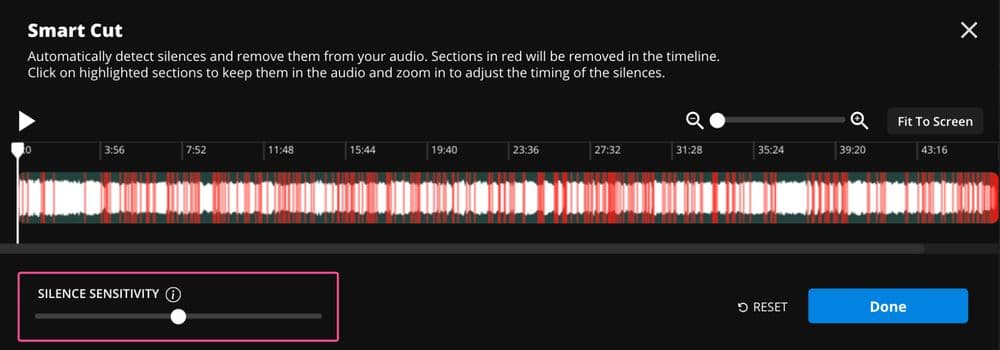
Smart Cut is part of Kapwing’s suite of AI video editing tools, that automatically cuts silence from your video or podcast. This auto video editor takes seconds.
The best part: just like Kapwing’s other useful tools, Smart Cut is built right into the full-suite editor. There’s no need to use one tool then export to another to remove silences. Just a single click and you’re done.
Smart Cut not only lets you create videos ten times faster, it leaves you 100% in control. Adjust the threshold to change how the silence detector defines which moments to cut, select clips to restore from the cutting room floor, and when you’re done, finish the rest of your edits all in one place.
Whether you’re creating professional video presentations or TikTok content, Smart Cut is the quick way to automatically remove silence in your videos for multiple platforms.
Kapwing also has a wide selection of other tools to help you cut out the tedious editing so you can focus on the creative side.
✅ Reasons to try:
- Smart editing tools that remove silences, auto-generate subtitles, trim, cut, and resize your videos
- Cross-post content from other platforms to YouTube with the Instagram to YouTube resizer
- Create engaging content with auto jump cut and snappy transitions
- No software to download and no advanced plugins to get started
- Supports text-based video editing in multiple languages
⚠️ Reasons to skip:
- Smart Cut is only available as part of the Pro plan
- Currently lacks a dedicated app for mobile devices.
💲 Pricing:
- Pro plan – $16/month, billed annually
- Enterprise plan – Contact sales for a custom quote
Related Article: Cut Out a Section of a YouTube Video
2. Wondershare Filmora
Best silence remover tool for Windows
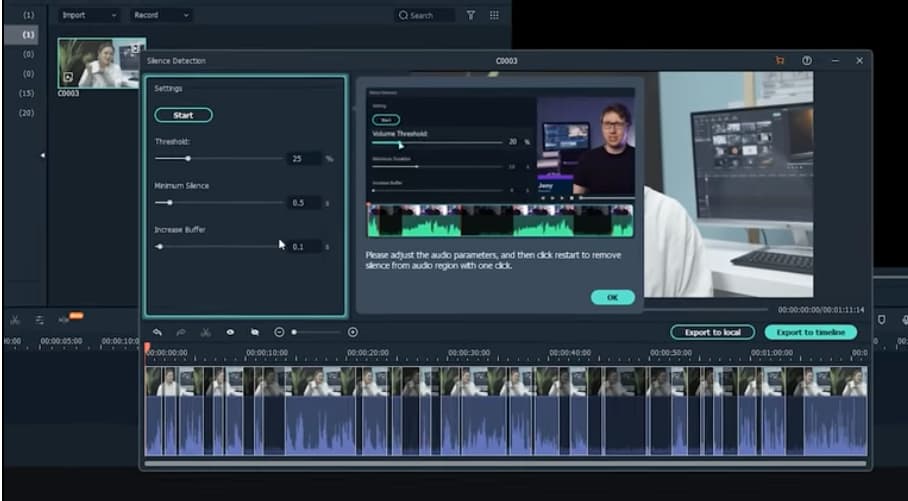
Wondershare Filmora has created their own silence detection add-on for their software. This tool is now available for Windows and Mac. The silence detection tool is an additional download and comes with a separate fee.
What we like: Filmora’s silence detection tool is user friendly and can be learned quickly. Rendering speeds are super fast and the interface is easy to navigate. Plus this add-on is less expensive than other silence remover tools.
What we don't like: This tool is only compatible with Filmora, which means you cannot use it with other software. This might not be a deal breaker if you’re a Windows user. But Mac users who want to use iMovie may find this limiting.
✅ Reasons to try:
- Silence detector works quickly.
- Threshold, buffer and duration can be customized.
- One-time purchase or monthly subscription
- Recently updated to include MacOS 10.14 and later.
- 7-day free trial for both Mac and Windows
⚠️ Reasons to skip:
- Is an additional download
- Requires more memory to work well
- Not as powerful as competitors
💲 Pricing:
- $49.99/year for subscription
- $79.99 perpetual license
3. Apple iMovie
Best silence remover software for Macs
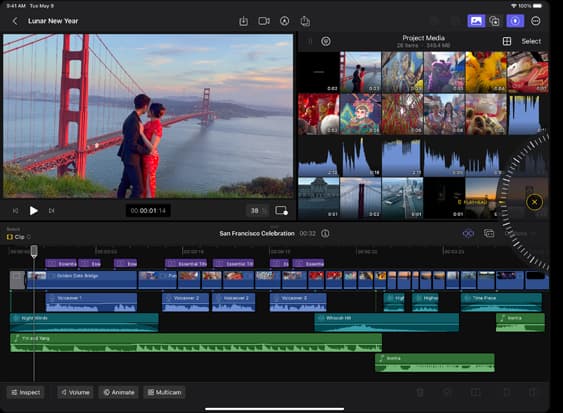
Surprisingly, Apple’s free iMovie software has some pretty useful tools to remove silence. It doesn’t remove silence from your video automatically, but it’s still pretty efficient. There are several different ways you can enhance and correct audio tracks on iMovie, all for free.
You read that right, free.
While Apple iMovie doesn’t work on Windows, Chrome or Linux, it does work on your mobile Apple devices. You can use multiple video apps with iMovie, as long as your OS is up to date.
Be forewarned: iMovie does require a large amount of space for download. But the fact that this free software is fairly easy to use and removes silence is pretty impressive.
✅ Reasons to try:
- Beginner Friendly
- Intuitive interface and easy learning curve.
- Lots of features for editing audio tracks.
- Works with Macs and Apple mobile devices.
⚠️ Reasons to skip:
- Is fast but not 100% automated
- MacOS and iOS only
- iMovie is resource greedy
💲 Pricing:
- Free
4. Adobe Audition
Best silence remover tool from Adobe
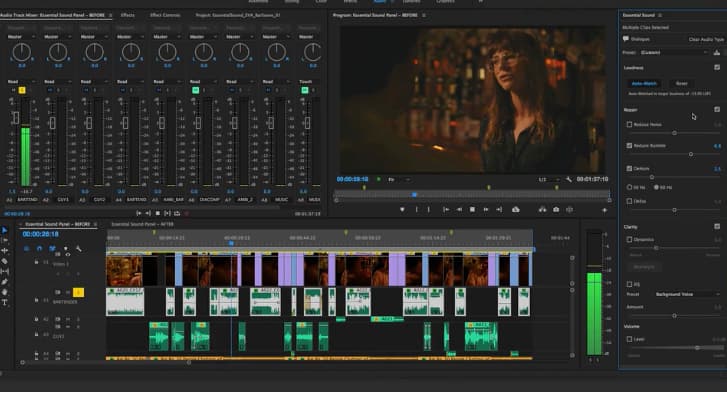
Adobe Audition is one of the many additions available in the Adobe Creative Suite of software. Audition works with Adobe Premiere Pro, which is popular with professional video editors.
Audition requires an additional fee and download. If you already have a machine that can run Adobe’s resource intensive programs, then Audition is a great addition to your editing software.
Adobe Audition has a steep learning curve, but once you get the hang of the software, it’s pretty efficient. As with other Adobe tools, if you’re editing large clips, exports will take longer and drain more resources.
✅ Reasons to try:
- Works well with Adobe Premiere Pro
- Automatically cuts silent parts and long pauses
- User can define what noises to keep and what to remove using Mark Audio tool
- There’s a 7-day free trial in case you want to try one of the other Adobe compatible silence remover tools.
⚠️ Reasons to skip:
- Resource draining
- Requires additional downloads
- Additional subscription on top of Adobe Premiere Pro’s fee
💲 Pricing:
- $20.99/month when billed annually
- $31.49/month when billed monthly
5. Recut
Best for Pre-editor for DaVinci Resolve, Final Cut Pro, and Adobe Premiere Users
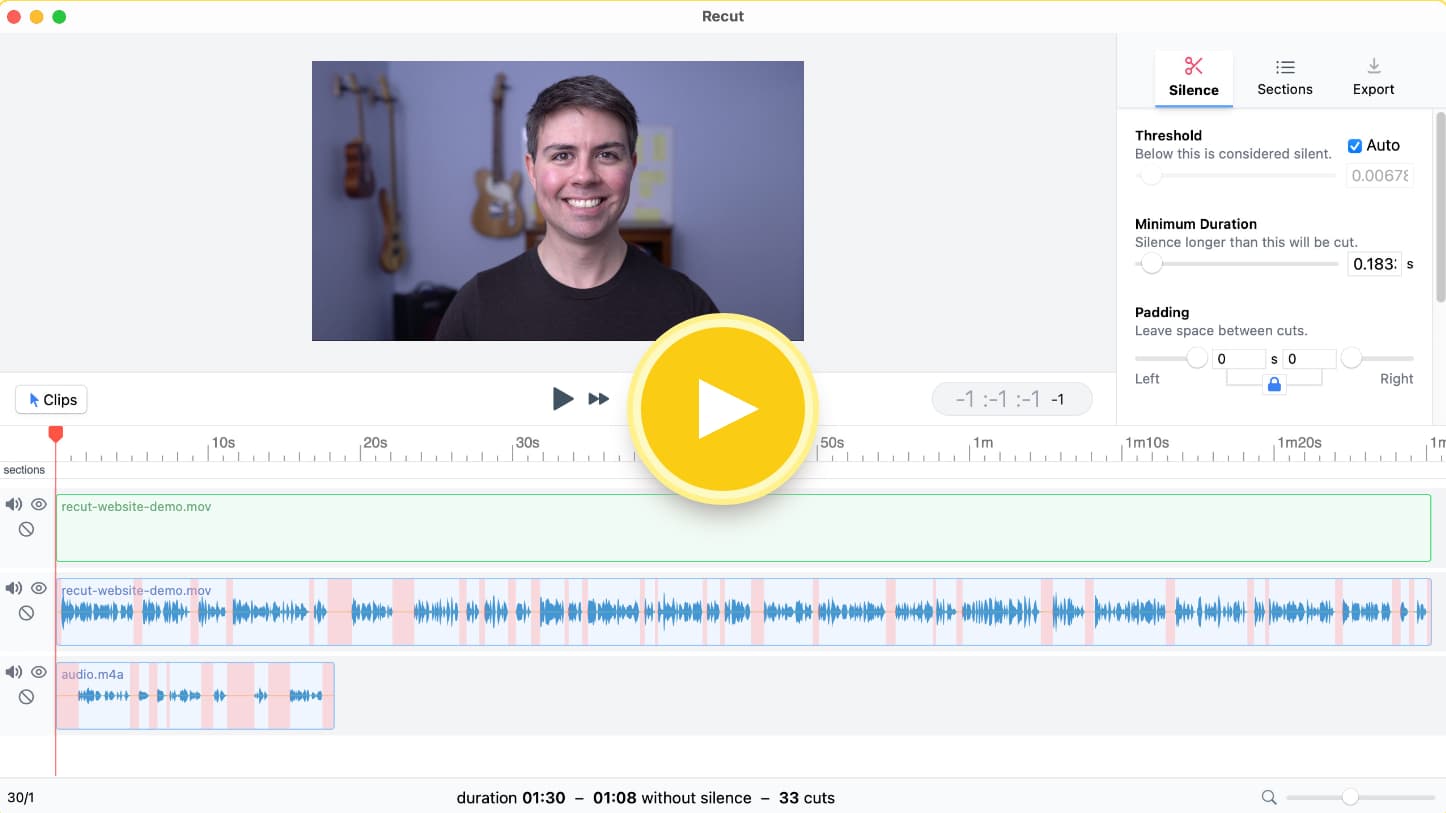
Recut is a pre-editor you can download specifically to remove silences from your videos. Unlike plugins that you add to your current service, you process your video through Recut first. Once the silences are removed, you export your file to any software that is compatible with Recut.
We're putting Recut at fifth on this list because it's an extra step and requires an additional license to operate —not a proper editor in its own right. That said, it is fast and intuitive like Smart Cut and compatible with some of the leading video editors, like DaVinci Resolve, Final Cut, and Adobe Premiere Pro.
The extra steps and costs can make Recut a hard sell. But if you're a DaVinci Resolve, Final Cut, or Adobe Premiere power user and don't want to switch editors just for automatic silence removal functionality, this may be the solution you're looking for.
✅ Reasons to try:
- AI-powered silence detector works quickly
- Intuitive interface and easy learning curve
- One-time purchase
- Works with popular video editing software
⚠️ Reasons to skip:
- Requires several steps after silence is removed to upload into your video editor
- Silence detector settings need to be adjusted for optimal performance
- Pretty pricey for a uni-tasker software
💲 Pricing:
- $99
How To Cut Silence From Video Clips
The fastest way to remove silences from video clips is with automatic tools. We recommend our automatic video editor, Smart Cut.
To use Smart Cut, simply follow these three steps:
- Upload your video to your Kapwing account.
- Select the Smart Cut button on the right hand side. Use the silence slider on the bottom of the screen to adjust the sensitivity.
- That’s it! Now you’re ready to get to the fun stuff and create a dynamic video with our templates and effects. With Smart Cut, you can edit audio tracks 10x faster!
No matter which software you prefer, silence remover tools are a game-changer. Even the most seasoned pro still finds plenty of long pauses and silent parts in otherwise amazing audio tracks. It’s just human nature.
Why spend hours editing manually when you can automatically remove those silences instead?
We hope this guide to silence remover tools has helped you choose the tool that will work best for you.
Additional Resources and Tools:
- AI Voice Over Generator
- Ten Tools You Didn't Know Existed in Kapwing
- Magic Wand Tool Online: Remove Backgrounds for Free
- How to Auto-Subtitle a Video
- 5 Videos You Can Create Using the Screen and Camera Recorder